Sorry about the lack of posts it is due to my lack of energy lol! As all of you know I am expecting my 4th and final baby. I am due January 1, 2012. We are very excited to bring a new life into the world and cannot wait until next month when we get to see what gender our little bean is. We are hoping for a boy to even out our little family but we will be happy with either of course. Just a happy healthy baby is enough for us. We have picked our names we like.
Tanner James Simpson for a boy
Mckenna Hart Simpson for a girl
I have been feeling slightly defeated lately which I am guessing has alot to do with all the extra hormones coursing through my body. I feel like I am doing something important with my life as a mommy I am molding my children into the wonderful people they are becoming. But I wonder if that is all I should be doing... Should I be working or maybe going to school? Could I handle anything else on my plate...? I have no idea. Do I even want to add anything to my plate? Who knows. I guess it will just be something I have to think about harder and longer.
There is one thing I definitely want to do and that is start writing blogs more and also cooking more gourmet cuisine. I just dont know what to cook... lol. So if you have any suggestions feel free to write me a comment. Whats your favorite meal? Is it a family recipe or maybe something your stumbled upon on the internet? Also I would really like to start creating more, sewing,crafting,crocheting. Just doing really.
There will definitely be some recipes including tomatoes,cucumbers,peppers,zucchini,patty pans and corn soon :D My garden is taking off and I cannot wait to see my beautiful harvest in some awesome fresh dishes. What do you do with these ingredients? I cannot wait to cut a tomato in half sprinkle it with some salt and pepper and dig in. Yummmmm nothing beats a homegrown tomato.
Well that is enough for now time to get dinner going and pick up the hubs from work. Expect to see more posts soon. I promise to stop slacking.
Tuesday, July 19, 2011
Thursday, April 28, 2011
Terrible 2's Treacherous 3's and Fearsome fours Eeek!!
Soon I will have a newborn a 2 yr old a 3yr old and a 4 yr old! Ah I am getting alittle nervous. Maddie and Parker are getting into a stage where they are very defiant. So calling all you moms out there.... What are your tried and true techniques to reprimand and see results? I go out of my way to make sure that my kids are not spoiled and have good manners. The only problem with the spoiled thing is I like to do nice things for/with my children so it is hard to decide if it is spoiling them or just making the most out of my time. How do you feel about this? My kids have alot of toys and stuff in general. Everything I do really I do for my children. They come first and I would buy them something without hesitation and it takes me about 30-40 minutes of procrastinating before buying myself a $3 item. It usually also takes a call to my husband making sure it is ok by him. I normally get yelled at for that last part lol!
 Hahahaha yeah they look sweet huh?? They are most of the time and I love them to death just need alittle help from all you awesome people
Also wondering what you feel is more important a clean house or happy children..? I am trying to keep things neat and tidy but the clutter takes over sometimes. I would say that deep down my house is clean but on the surface it is slightly out of control. I need to purge and get rid of things. Maybe a yard sale :D!! Lots of baby clothes lots of toys and tons of other stuff lol. We will see. I will add it to my never ending list of things to do. Also are any of the rest of you drowning in laundry. I can get my laundry washed and dryed. It is just a matter of getting it hung,folded and put away. How do you accomplish this? How many loads of laundry a day do you have to do to keep the mountain under control?
I know this is alot of ?'s I am just hoping mom to mom or mom to dad or mom to friend you can help me out with your helpful amazing ideas!! :D
Tuesday, April 26, 2011
Easter Fun!!
My Easter week and weekend were jam packed! So many amazing things occurred. I found out I was pregnant and that explained the exhaustion. I knew that I had been going and going and going but I was REALLY tired. Finding this out made my day... actually my forever. We were trying to get pregnant and it took about 3 months. So we will have 4 beautiful children to make up our family. I will be 25 with 4 children 4 and under. WOW!! I was also sewing and sewing and sewing. Trying to get easter baskets Ashlynn's dress and Maddie's skirt done. I am so happy that I got it all done.
For the Easter baskets I used this tutorial for a guideline:
http://kikicreates.blogspot.com/2011/04/little-bunny-basket-all-about-easter.html


 I stemmed pretty far from the original design on Parker and Ashlynn's and didnt follow completely for Maddie's but pretty close. Go check out her blog she is pretty awesome.
I also made the girls Easter dress/skirt!! The dress I just did as I went along. And the skirt I made from this awesome tutorial over at Made:
http://www.dana-made-it.com/2011/04/simple-skirt-simple-tutorialeaster bunny basket.html

 this is a Teresa original lol!!
I had some late nights but it was all worth it to see the girls in there pretty outfits and parkers eyes aglow about his angry birds easter basket!!
We had alot of fun doing an easter egg hunt around our yard! Eating good food and of course a TON of candy. Oh and cant forget dying eggs.

I love making the holidays an event instead of just another day. I love creating memories for my children and I hope that they remember the fun stuff forever :D I hope everyone had an awesome easter I know we did!!!
For the Easter baskets I used this tutorial for a guideline:
http://kikicreates.blogspot.com/2011/04/little-bunny-basket-all-about-easter.html


I also made the girls Easter dress/skirt!! The dress I just did as I went along. And the skirt I made from this awesome tutorial over at Made:
http://www.dana-made-it.com/2011/04/simple-skirt-simple-tutorialeaster bunny basket.html


I had some late nights but it was all worth it to see the girls in there pretty outfits and parkers eyes aglow about his angry birds easter basket!!


I love making the holidays an event instead of just another day. I love creating memories for my children and I hope that they remember the fun stuff forever :D I hope everyone had an awesome easter I know we did!!!
Thursday, April 21, 2011
Wildflowers & Whimsy: Skye Reve Fabrics Giveaway
Wildflowers & Whimsy: Skye Reve Fabrics Giveaway


Go check this our if you want to win some pretty fabric! Follow the rules towards the bottom of the post
Friday, April 15, 2011
Lets eat some Greek!
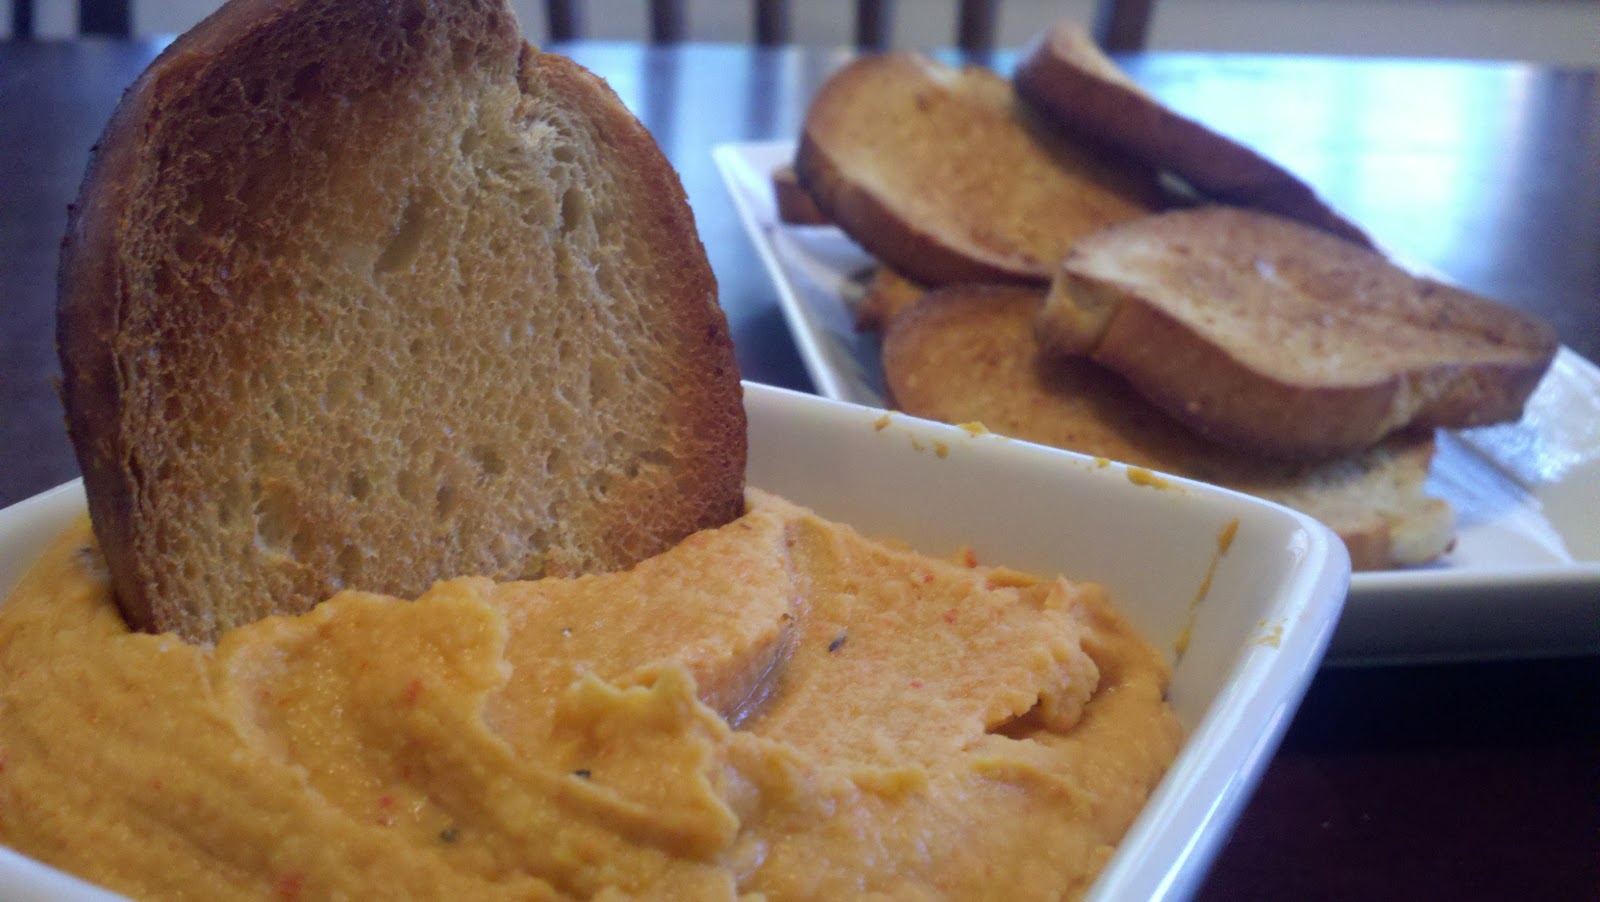
We had some of our best friends over last night for a dinner party! I love entertaining and usually do alittle too much!! So this night we went greek I didn't take pictures of everything because by the time dinner was done I couldnt help myself but dig in to all the awesome smells!! I can give you all the recipes I used or came up with. So that you can have your own greek themed night. I always like to have some sort of appetizer because dinner is never done on schedule. So I made hummus. Here is what u need. I had all this stuff laying around. And this was the recipe I came up with-
Ingredients:
1/2 Red Bell Pepper
4 cloves garlic
1 can garbonzo beans (chick peas)
2-4 T. EVOO
salt to taste
Roast red bell pepper in a 450 degree oven for 15 minutes on a baking sheet. @ 15 minute mark flip your pepper and toss in your garlic cloves skin still on. roast 10-15 minutes longer or until garlic is tender. When garlic is soft take pan out of the oven and remove skin from both the pepper and garlic and shove in a food processor blend into a paste. Next drain your beans and pour them into your food processor pulse until incorporated. Drizzle in some of your EVOO and check your consistency. Add more as needed!! Then check your flavor add salt as needed pulse a couple time to incorporate. I also added a pinch of chipotle rub(pampered chef) I like alittle spice you could easily do cayenne or anything else you have lying around or it would be fine alone either way this is a good recipe if you like hummus.


I also made Turkey gyro burgers and authentic oven roasted greek potatoes.
I used this recipe for a couple of parties when I did pampered chef and it was always a crowd pleaser. It is also pretty low cal I am guessing cause it is made with very lean ground turkey. I could not find pitas and most of the time when I can they are stale so I decide to do a little spin of my own and make gyro burgers.
Here is the turkey gyro recipe I used:
Ingredients:
1/2 Red Bell Pepper
4 cloves garlic
1 can garbonzo beans (chick peas)
2-4 T. EVOO
salt to taste
Roast red bell pepper in a 450 degree oven for 15 minutes on a baking sheet. @ 15 minute mark flip your pepper and toss in your garlic cloves skin still on. roast 10-15 minutes longer or until garlic is tender. When garlic is soft take pan out of the oven and remove skin from both the pepper and garlic and shove in a food processor blend into a paste. Next drain your beans and pour them into your food processor pulse until incorporated. Drizzle in some of your EVOO and check your consistency. Add more as needed!! Then check your flavor add salt as needed pulse a couple time to incorporate. I also added a pinch of chipotle rub(pampered chef) I like alittle spice you could easily do cayenne or anything else you have lying around or it would be fine alone either way this is a good recipe if you like hummus.

I also made Turkey gyro burgers and authentic oven roasted greek potatoes.
I used this recipe for a couple of parties when I did pampered chef and it was always a crowd pleaser. It is also pretty low cal I am guessing cause it is made with very lean ground turkey. I could not find pitas and most of the time when I can they are stale so I decide to do a little spin of my own and make gyro burgers.
Here is the turkey gyro recipe I used:
Gyro Meat:
1/2 small onion, finely chopped
2 Tbsp fresh Italian parsley, chopped
2 cloves of garlic, minced
1 lb ground turkey
1/2 tsp dried thyme
1/2 tsp salt
1/2 tsp ground black pepper
Yogurt Sauce:
1/2 cup plain lowfat yogurt
2 cloves of garlic, minced
1/8 tsp salt
2 Tbsp fresh Italian parsley, chopped
1/4 cup cucumber, finely chopped
4 flat pita rounds without pockets
Sliced cucumbers and tomatoes
Sliced cucumbers and tomatoes
Preheat oven to 350 degrees. In a large mixing bowl, combine the above gyro ingredients. Mix vigorously until well blended. Form turkey mixture into four, thin rectagular loaves about 1/4 inch thick. ( I made six burger patties)
Cook in a nonstick skillet on medium heat for 1-2 minutes on each side or until browned. Place skillet in oven and bake an additional 11 - 13( I cooked them in the oven for 5 mintues and they were done) minutes or until loaves are no longer pink in the center. Remove turkey loaves from oven. Thinly slice lengthwise.
Meanwhile, prepare sauce. In a small bowl, combine all sauce ingredients.
To finish gyros, warm pita bread in oven. To serve, arrange turkey slices over pita bread, top with 1 tablespoon of yogurt sauce, sliced cucumbers and tomatoes.( I piled it all on whole wheat burger buns)
Recipe from Pampered Chef's "29 Minutes to Dinner" cookbook
I also made authentic oven roasted greek potatoes also called patates sto Fourno:
this recipe I found on About.com
Ingredients:
- 5-6 potatoes, peeled and cut in to evenly sized wedges
- 1/2 cup olive oil
- 1 tsp. dried oregano
- 1 tsp. garlic powder
- Two lemons, juiced (plus more for serving)
- 1/2 cup chicken broth
- Salt and freshly ground black pepper to taste
- Note: When I serve these with roast lamb, I also add a teaspoon of dried rosemary to the mixture and that works very well.
Preparation:
Preheat the oven to 400 degrees.
In a large mixing bowl, add the sliced potatoes and toss them with the remaining ingredients until they are well coated.
Lightly grease a non-reactive half sheet pan with olive oil. Place the coated potatoes in a single layer and drizzle them with any remaining marinade left in the bowl.
Bake in a 400 degree oven for approximately one hour. Carefully turn the potatoes halfway through cooking to prevent them from sticking and to brown them evenly.
Re-season with salt and pepper and squeeze a bit more lemon juice (if desired) when they are fresh out of the oven.
I hope these recipes inspire you to get together have a good time with some friends and of course have some good food!
I hope these recipes inspire you to get together have a good time with some friends and of course have some good food!
Tuesday, April 12, 2011
Parker the snack helper!!

And everyday a different child brings snack. When that child brings snack he/she is the snack helper for the day and they get to pass out the snack with the teacher. This is a huge honor and not taken lightly at all!! The kids all love to help. Too bad I cannot get him to help more at home huh? Well this week was our snack day. His snack day happened to land on duck day. So I wanted to do something that was duck related. I have been wanting to make some candy coated marshmallows for the kids and though it would be a fun project that they could help with. I also wanted a ducky twist so I was on a mission I headed to Michaels with duckies in my head and came up with this idea with a little googleing and couple of my own twists here they are.

I love this little saying with the play on words and thought it was relevant. I then added a felt duck to each circle and added them to the packaging with the included silver bag tie. I had to cut the cellophane bags down so that they were not double the size of the pops

If you want to make some of your own marshmallow pops heres what you will need:
Marshmallows
Candy Melt (about half a bag I used yellow you could use any color depending on occasion/holiday)
coordinating sprinkles
cellophane baggies
lollipop sticks
Instructions:
1.Melt candy coating according to package
2.Skewer marshmallows with lollipop sticks
3. Dip marshmallows as much as you would like in candy coating and twist to get of excess( I just did the top 1/3)
4. Dip gently directly into bowl of sprinkles
5.Place your Marshmallow pops into the bottom of a turned over colander (found this tip while perusing the net :D Pretty neat trick I would say)
6.Prepare your tags with any funny or cute saying you would like and assemble your packages
7. Watch your child beam with delight when you hand them pure sugar coated with sugar .... and dont forget sprinkled with some more SUGAR!!!
Ps: This may be a good day to plan a trip to the park
Thursday, April 7, 2011
Hey All!!!
I know it has been a long time since my last post! This does not mean that I am no longer cooking for my family :P. We have just been extremely busy and I have not had the time or the energy to write down recipes or reviews of what I am cooking! I was also thinking of incorporating more in to my blog. More about life, creating, couponing and of course my love of cooking will still be included also. I want this to be a way for me to look back, a way for me to remember the little things and share them with friends, family and anyone else that would like to read them. So my blog design is going to change. And so is the content! Check back soon and see if you like the new design and feel of what I am going to have going on :D And feel free to send friends and family my way too if you think they will like what I have to say and share. The more the merrier.
Tuesday, March 22, 2011
Broccoli, Ham and Cheese Foldovers
I found this recipe on the Betty crocker website and I am glad I did!!
Broccoli, Ham and Cheese Foldovers
Ingredients-
| 4 1/2 | cups Original Bisquick® mix |
| 1 | cup boiling water |
| 1 | box (10 oz) Green Giant® frozen broccoli & cheese flavored sauce |
| 2 | cups finely diced cooked ham |
| 1/2 | cup cheese-flavored French-fried onions( I omitted these all together I didn't to spend the extra money for such a little amount and they only come in the large can) |
| 1/2 | cup shredded Cheddar cheese (2 oz) |
| 1 | egg |
| 1 | tablespoon water |
| 1 | tablespoon grated Parmesan cheese, if desired Directions 2.Cook broccoli & cheese sauce as directed on box; empty into medium bowl. Stir in ham, onions and Cheddar cheese; set aside. In small bowl, beat egg and water with fork or wire whisk until blended; set aside. 3.Pat or roll 1 ball of dough into 7-inch round. Spoon about 1/2 cup ham mixture onto half of the round; moisten edge of round with water. Fold other half of dough round over filling; press edge with fork to seal. Place on cookie sheet. Repeat with remaining dough and filling. 4.Brush tops of foldovers with egg mixture; sprinkle each with 1/2 teaspoon Parmesan cheese. Cut 3 slits in top of each for steam to escape. Bake 25 to 30 minutes or until golden brown. Rating- 5 out of 5 Look- Nice Golden crust and very vibrant green when you bite into them Difficulty-EASY Review- This recipe is easy to follow with a great end product. There is alot of good flavor and even some veg. which adds alot to the dish. It was also not very time consuming took about 20 minutes to prep and the rest of the time was in the oven.  This will definitely be a recipe I make again and I will probably be posting some creative variations just using the crust itself :D Let me know if you try this and what you think. |
St Pattys Day/ Rainbows and Leprechauns!!!
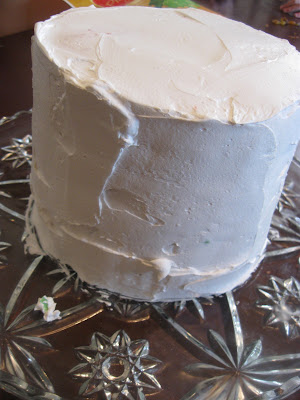
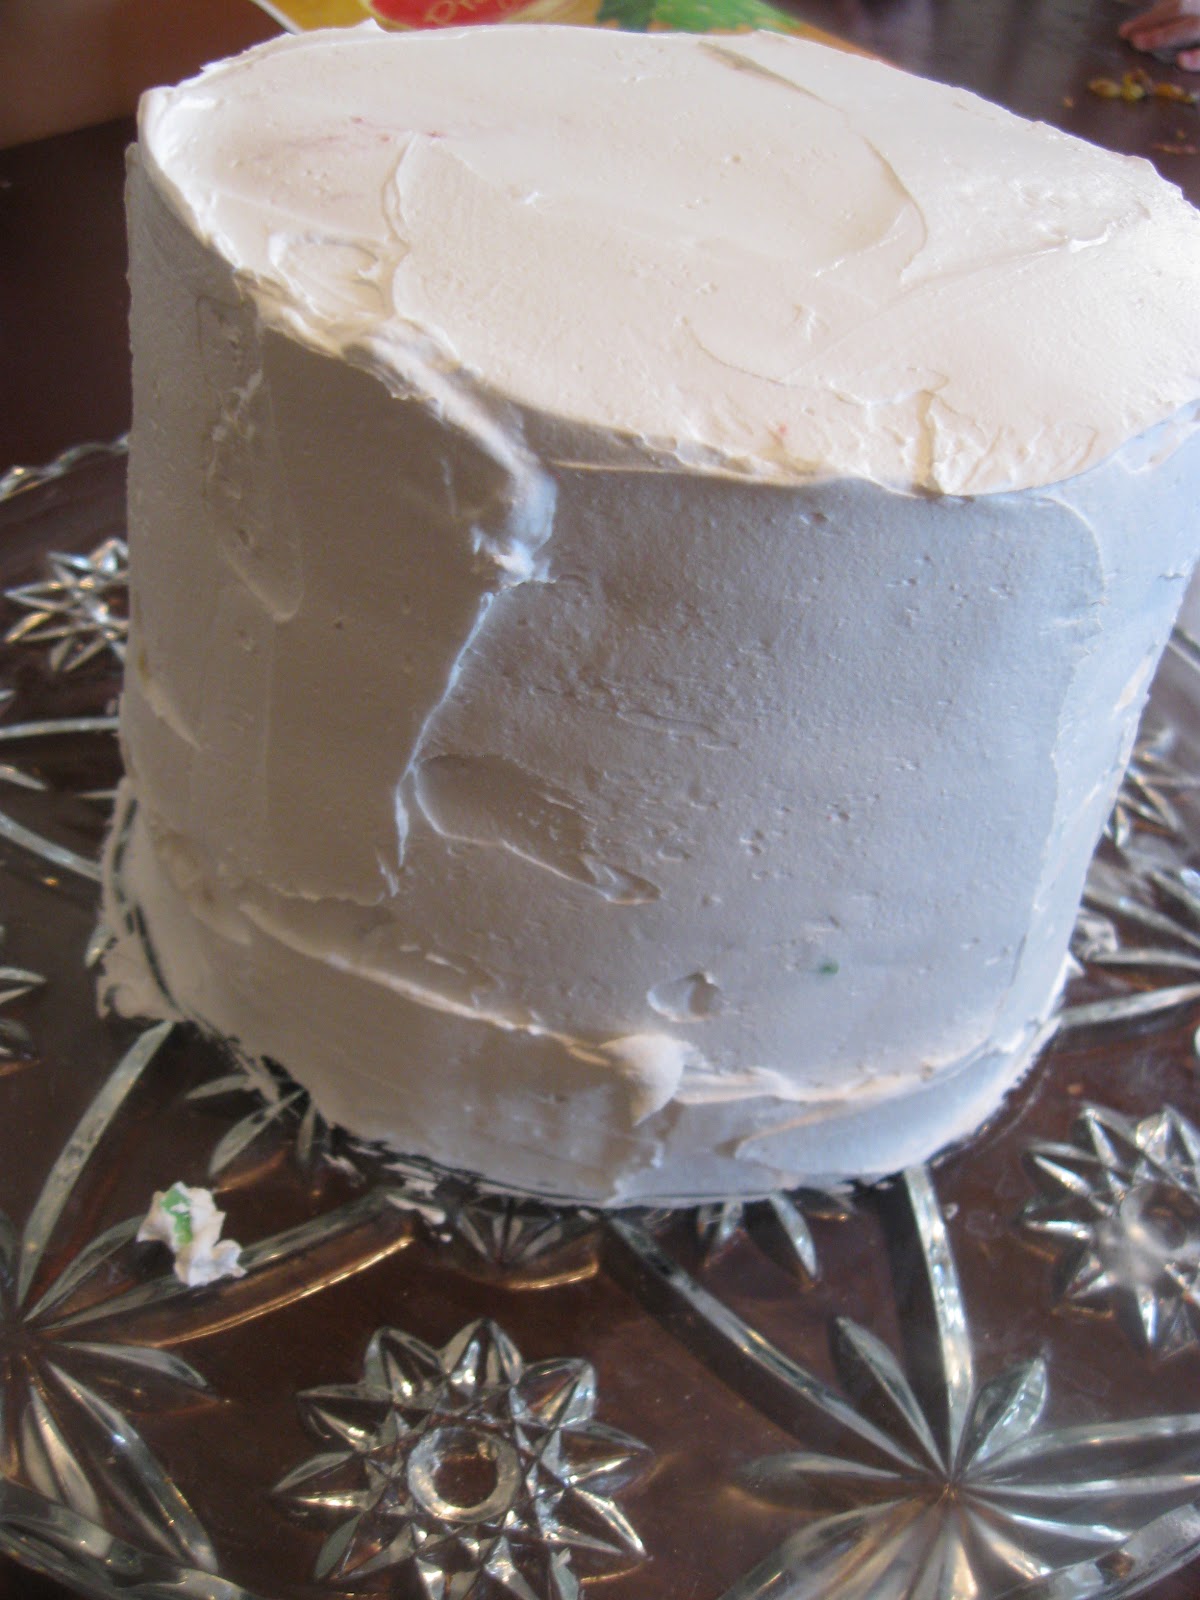
I always try to do alot of fun stuff for the kids on holidays! My motto is it is not how much I spend on my kids but about the things we do and the memories we make. So on Saint Patty's day I did a couple fun things! I made them all shirts and I actually didnt get a picture of all of them in them before we went to a bday party where they got sauce on them! But parkers had a sewn on tie and pocket and the girls had two shamrocks each. Which they all loved and looked super cute in. I also painted a bunch of rocks gold so that we could do a scavengers hunt for the leprechauns gold in the front yard. Which they have now put int there sandbox so that they can pan for gold all summer long. For breakfast we had green eggs and ham. Which is made the normal way I make eggs I just added a couple drops of blue to the eggs to make them green. And we also made a rainbow cake which I got the idea from the family fun website last year. I made the cupcakes last yr and I decided to make a cake this year.
Taste a Rainbow cake/cupcakes:
Ingredients
Boxed white cake mix
food coloring(red, blue, green and yellow)
Baking cups ( if you are making cupcakes)
whip cream (optional) ( I used a whipped buttercream frosting)
Directions
1.Prepare your favorite white cake mix, then divide the batter evenly among six small bowls. Following the chart below, dye each bowl of batter a rainbow color
Purple-9 red+6 blue drops
blue - 12 drops
green- 12 drops
yellow- 12 drops
red -18 drops
orange-12 yellow+4 red
I used a 5 inch pan. Which I only have one of so I just made one layer of the cake at a time. It was 375 for ten minutes a piece. I let them cool for 15 minutes then flipped them out onto a cooling rack. I placed them in a gallon size bag and separated them with wax paper to keep them from sticking. I put them in the fridge over night. The only reason I did this is because it was getting late you could assemble your cake as soon as they are all cooled if you have the time. Then I layered them in rainbow order red being top and purple bottom. With a layer of frosting in between each. And then frosted like normal.
And this is how it turned out:


This cake is alot of fun :D And the kids loved eating it and it is also a great learning tool so that you can discuss all the colors and which ones are which while eating all the yummy goodness. This would also be an awesome cake for any sort of birthday party where you have a color scheme or theme because you could easily pick colors to go along with your scheme/theme and layer them accordingly :D
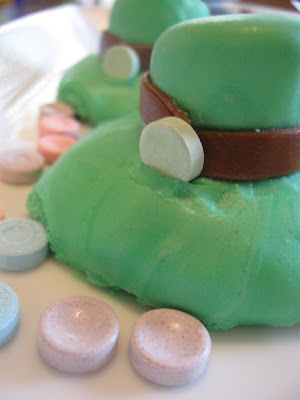
Oh and my kids were high on sugar this day because we also made another sweet these totally awesome leprechaun hat cookies :D
Ingredients
1 pkg sugar cookie mix
1 pkg lrg marshmallow
1 tub of vanilla frosting
Directions
Bake cookies according to pkg. as soon as you remove them from the oven place a marshmallow on top of each cookie. Take your can of frosting and put it in the microwave for 30 seconds and then stir to check consistency. You want it to be very loose. Add thirty second more until it reaches this consistency. Add green food coloring until it is desired color. And then spoon over your marsmallow and cookies. To make the band of the hat roll out tootsie rolls and then shape around the hat. I used sweet tarts as the pendant on the betty crocker website they used gumdrops. I roll with what I have on hand. This is how they turned out.

Parker brought these to school for his teachers who both said that they loved them :D So that is our St. Pattys day. Alittle late I know but better late then never right?
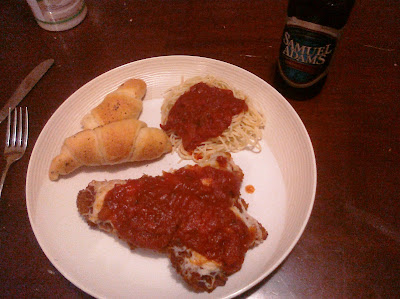
Chicken Parmesan!!
This is a family favorite and this time I made sauce from scratch it depends usually on what I need to use. If I make it from scratch or use the rest of a jar. But this time I had some roma tomatoes that were quickly taking a turn for the worse so I wanted to use them before they went bad!! I try to not let food go to waste. I dont always succeed but it is my goal. So here is my recipe for Chicken Parmesan and the homemade sauce.
Sauce:
Ingredients
4 roma tomatoes diced
1/8 lrg.red bell pepper diced
1/2 small yellow onion diced
3 cloves garlic minced/pressed
1T EVOO
1t. salt
1 1/2 c. water
3/4 little can tomato paste
1/2 t. dried basil
1/2 t. oregano
2T. Parmesan cheese
Sautee red bell pepper, onion and garlic in bottom of sauce pan with Evoo. Let cook until tender then add tomatoes, basil, salt and oregano. Let cook on low till very tender and most of the juice has escaped. (5-7 min). Add water stir let simmer 2 more minutes. Then gradually add in your tomato paste until the consistency that you like!! I added 3/4 of the can and it was perfect and stuck to the pasta well. I also added 2T. parmesan directly into the sauce and of course on top later :P
Chicken Parmesan:
Ingredients
2-4 boneless skinless chicken breasts ( this all depends on the size of your family and the size of the breasts)
1-2 c. flour
2-4 eggs
4-8 c. crushed corn flakes
1-1 1/2 c. vegetable oil
mozzarella cheese
Parmesan cheese
Place one chicken breast in a Gallon size bag and beat with a heavy frying pan or meat mallet. Repeat with as many breast as you have. Pour flour onto lrg plate and corn flakes onto a separate lrg. plate. Beat eggs in a shallow but wide bowl. Start your oil on medium heat in a deep frying pan. Dredge your chicken in the flour first, egg wash second and Corn flakes last! Make sure to coat well and get in all the little cracks and crevices. Place one chicken breast at a time into the frying pan allow chicken breast to cook completely and brown on each side. While your breasts are frying preheat your oven to 375. And also prepare you cookie sheet. I like to put my cooling rack directly on top of my cookie sheet so that the chicken stays crunchy and doesn't get soggy on the bottom. Remove breast from pan and put on cookie sheet. When all are done take your sauce and put a small amount on the top cover with as much cheese as you see fit..( I like ALOT) and then put in the oven! Turn the light on. When cheese is fully melted turn on the broiler (keep your oven door cracked this allows you to see and something about it makes them brown properly). And voila your done Bon Appetit!!

This is just my recipe so please let me know if you try it and what you think :D Oh and Subscribe subscribe subscribe!! Thanks :D
Sunday, March 20, 2011
Slow cooker Steak and black bean chili
I made this because the picture looks great and my family and I looooove chili. Plus hello another slow cooker recipe. Oh and another thing that made me want to try this was the STEAK!! I am a very large fan of steak. I found this recipe on the betty crocker website.
Slow cooker Steak and black bean Chili-
Ingredients-
Slow cooker Steak and black bean Chili-
Ingredients-
| 2 | lb beef top round steak |
| 1 | envelope (1 oz) onion soup mix (from 2-oz package) |
| 2 | cans (15 oz each) black beans, rinsed and drained |
| 1 | can (28 oz) diced tomatoes, undrained |
| 1 | can (8 oz) tomato sauce |
| 1 | can (4.5 oz) Old El Paso® chopped green chiles, undrained |
| 3 | teaspoons chili powder |
| 1 | teaspoon ground cumin Directions: 1.Trim fat from beef. Cut beef into 3/4-inch cubes. In 3 1/2- to 4-quart slow cooker, mix beef and soup mix (dry). Stir in remaining ingredients. 2.Cover and cook on Low heat setting 8 to 10 hours Rating-5 out of 5 Look-Very rich red. Difficulty-Easy Review- This recipe was very good required no real work and was ready at dinner. I think next time I will add one or two chipotles in adobo for smokiness and a bit of spice. 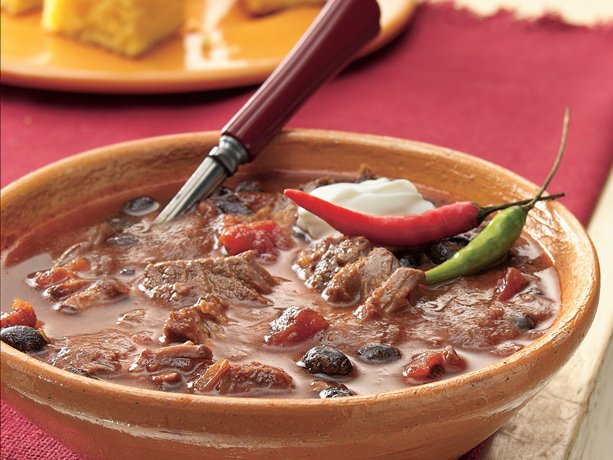 The picture is the one from the website and I have no idea why it is on the side I couldnt get it to cooperate. I forgot to take a picture of mine. I know I am slacking. |
Friday, March 18, 2011
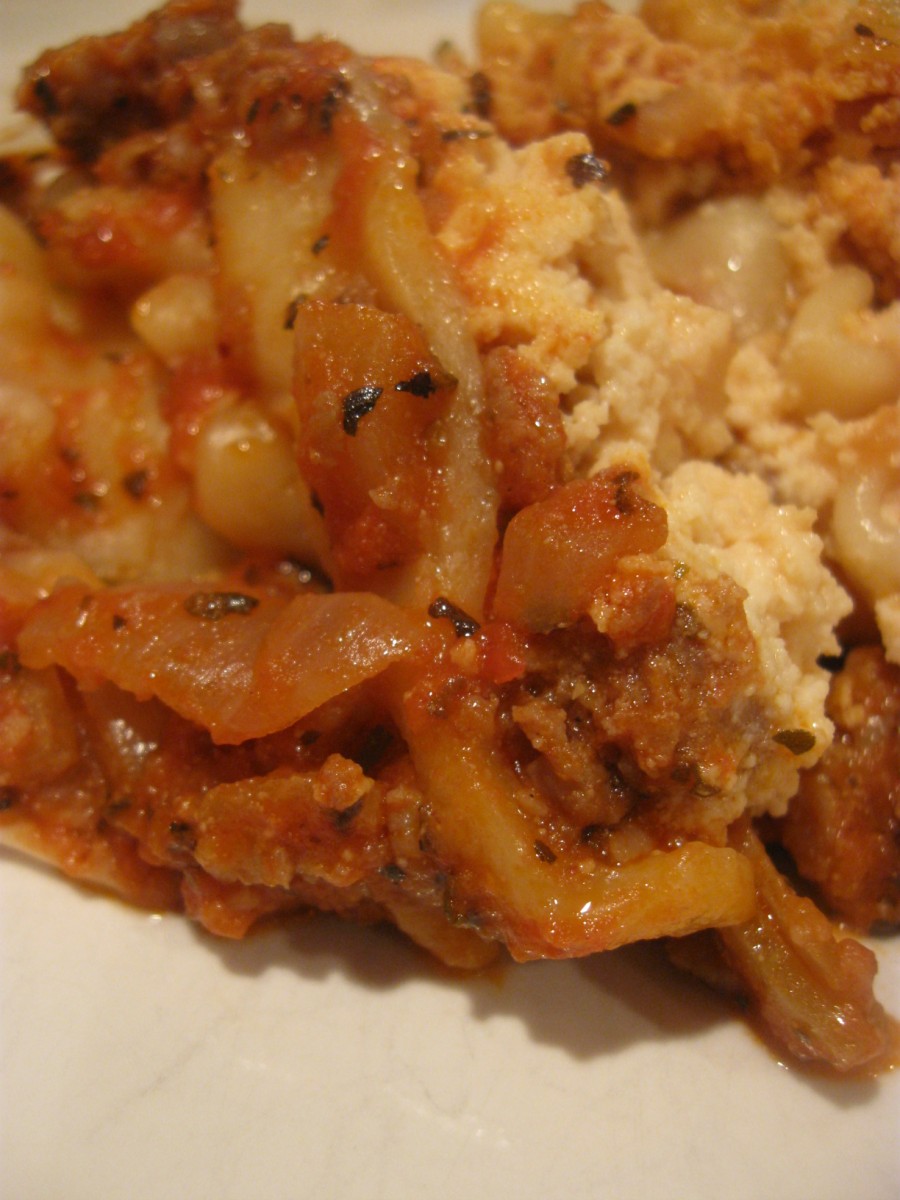
Slow Cooker ..... Lasagna. Yup that is right LASAGNA
Who doesnt like lasagna? I know I do! And who doesnt like prepping something in the morning or night before and having it ready when it is time to eat. Thats right I do again lol!! And hopefully you do too! Because todays recipe is a crock pot/slow cooker recipe and the next couple to come will be also. These are great for moms or people that work or both. I found this recipe on the Betty Crocker website.
Slow Cooker Lasagna
Ingredients:
((
Directions:
1.Cook sausage and onion in 10-inch skillet over medium heat 6 to 8 minutes, stirring occasionally, until sausage is no longer pink; drain. Stir in tomato sauce, basil and salt.
2.Mix 1 cup of the mozzarella cheese and the ricotta and Parmesan cheeses. (Refrigerate remaining mozzarella cheese while lasagna cooks.)
3.Spoon one-fourth of the sausage mixture into 6-quart slow cooker; top with 5 noodles, broken into pieces to fit. Spread with half of the cheese mixture and one-fourth of the sausage mixture. Top with 5 noodles, remaining cheese mixture and one-fourth of the sausage mixture. Top with remaining 5
noodles and remaining sausage mixture.
4.Cover and cook on Low heat setting 4 to 6 hours or until noodles are tender.
Rating-5 out of 5
Look- Deliciously cheesy
Difficulty- This takes alittle time to prep but just basic cuting involved
Review- This was amazing. And it was a ton of food there was about half left over after my family of 5 had atleast one if not two decent sized servings. It was nice to just set it and forget it and there was a ton of great flavor.

This is definitely a recipe I will make again and again. Maybe not in the coming months with the warm weather approaching but next winter this will be on our menu as a regular. It was so good that I got the kids there food and got them sitting and eating like I normally do and by the time I dished mine and got to the table Maddie was completely done and asked for seconds.
Slow Cooker Lasagna
Ingredients:
| 1 | pound bulk Italian sausage |
| 1 | medium onion, chopped (1/2 cup) |
| 3 | cans (15 ounces each) Italian-style tomato sauce( I used one jar of 6 cheese Ragu) |
| 2 | teaspoons dried basil leaves |
| 1/2 | teaspoon salt |
| 2 | cups shredded mozzarella cheese (8 ounces) |
| 1 | container (15 ounces) part-skim ricotta cheese |
| 1 | cup grated Parmesan cheese |
| 15 | uncooked lasagna noodles |
Directions:
1.Cook sausage and onion in 10-inch skillet over medium heat 6 to 8 minutes, stirring occasionally, until sausage is no longer pink; drain. Stir in tomato sauce, basil and salt.
2.Mix 1 cup of the mozzarella cheese and the ricotta and Parmesan cheeses. (Refrigerate remaining mozzarella cheese while lasagna cooks.)
3.Spoon one-fourth of the sausage mixture into 6-quart slow cooker; top with 5 noodles, broken into pieces to fit. Spread with half of the cheese mixture and one-fourth of the sausage mixture. Top with 5 noodles, remaining cheese mixture and one-fourth of the sausage mixture. Top with remaining 5
noodles and remaining sausage mixture.
4.Cover and cook on Low heat setting 4 to 6 hours or until noodles are tender.
Rating-5 out of 5
Look- Deliciously cheesy
Difficulty- This takes alittle time to prep but just basic cuting involved
Review- This was amazing. And it was a ton of food there was about half left over after my family of 5 had atleast one if not two decent sized servings. It was nice to just set it and forget it and there was a ton of great flavor.
This is definitely a recipe I will make again and again. Maybe not in the coming months with the warm weather approaching but next winter this will be on our menu as a regular. It was so good that I got the kids there food and got them sitting and eating like I normally do and by the time I dished mine and got to the table Maddie was completely done and asked for seconds.
Monday, March 14, 2011
Tiramisu
Me and my husband LOVE tiramisu. We usually get it at our fav. restaurant Spezia!! If you have not been. Go. End of story. Lol! Anyways so I figured I would try to make it at home sometime. But I have looked up the recipe many times and never been able to find the lady fingers. Because they do not sell them at walmart. And when I am other places I just usually forget to look because it is not on the top of my head/list. So the other day when I was perusing the isles at Aldi ( my #1 favorite store if you havent shopped there I encourage you to go there also) Anyways I happened upon lady fingers :D Alas I had found the coveted lady fingers I quickly wandered over to the cheese section and picked up a tub of ricotta. And later when I was unpacking all the bags on my dining room table I realized that my mind was playing tricks on me. There is no Ricotta in Tiramisu. I was thinking of a completely different dessert. CRUD!! I looked on the back of the lady fingers pack and saw that I actually needed mascarpone cheese. :( This is another thing that they do not sell at Wal-mart. So I looked up a different recipe and this is what I found. On the Food Network Website.
Directions

Tiramisu
Ingredients
- 1 cup heavy cream
- 3/4 cup sugar, divided
- 1 (8-ounce) package cream cheese, at room temperature
- 1 teaspoon vanilla extract
- 1 (7-ounce) package ladyfingers
- 1 cup strong black coffee
- 1 teaspoon cocoa powder( I also grabbed a Hershey's Dark Chocolate bar and grated and did Chocolate ribbons)
Directions
Have 4 (8-ounce) wine glasses ready.( I did this all in a 8 by 8 baking dish instead of the wine glasses although it would have been a pretty presentation it would not have been very kid friendly)
In a chilled bowl combine 3/4 cup of heavy cream and 1/4 cup sugar. Whip with a hand mixer until soft peaks form. Cover and refrigerate until ready to use.
In a large bowl combine the cream cheese, 1/4 cup heavy cream, vanilla and the remaining 1/2 cup of sugar. Whip with a hand mixer until light until fluffy.
Reserve 4 ladyfingers for garnish. Using1 lady finger at a time, snap or cut in half, then dip it quickly into the coffee, and drop it into the bottom of a wine glass. Repeat with the other 3 glasses. Put a heaping tablespoon of the cream cheese mixture on top of the ladyfingers in each glad. Do another layer of ladyfingers dipped in coffee, another of the cream cheese mixture, then 1 more layer of ladyfingers. Top with remaining filling and dollop with the whipped cream. Break the reserved 4 ladyfingers in half and insert 2 halves into the top of each glass.
Put the cocoa powder into a small sieve( I just sprinkled it with a spoon maybe not as pretty but it does the trick) and tap it gently over each glass to dust the tops. Refrigerate for at least 1 hour before serving.
Rating- 4 out of 5
Look- very nice would have looked even nicer if I did follow the directions and put in a wine glass
Difficulty- Very easy
Review- I loved the overall taste of this dish and it was really close to the tiramisu we normally get when out. The only problem I had was with the lady fingers. They soaked up too much coffee and we actually soggy. I would recommend maybe using pound cake. Also maybe instead of dipping the pound cake in coffee put a decent amount of the coffee directly into your whip cream. Maybe a shot of really dark espresso Chilled in the freezer would be best :D

Let me know what you do with this dessert to make it better. Or anything you would like to see me make and give you my opinions on. I will be making all crock-pot recipes this week for my cousin who requested something that she can easily do as a mom of 2 with a full-time job. So stayed tuned :D